
I decided that I would try to make my own bullet journal. There are a lot of different articles and bullet journals that you can find on the internet, so it was difficult for me to start. Everyone had their own systems and styles of bullet journals, and it was all very confusing. That's why this post is dedicated to those confused and curious beginner bullet journalers. Don't worry: you aren't alone.
Supplies
First things first: you're going to need a few things to make your bullet journal. Some people go all out with design and use tape and stickers and all of these fancy things, but for your first time bullet journaling, I think that it's best to start out simple.

For my first time bullet journaling, I decided to just use a few simple tools:
- a notebook with square paper
- a black pen
- a multi-colored pen
- colored pencils
There are different journals that you can use, and, really, you can use any journal as long as it suits your bullet journaling needs. I chose one with square paper because I thought that it would make a few things such as mini calendars a lot easier. Although, next time, I might choose a notebook with more than 80 pages. (This might not be enough for me.)

The pen I used was my favorite pen ever so that's why I used it, but if you want to use a pen that's fine. The multi-colored pen was partially for design and partially for color coding. The colored pencils had the same purpose as the multi-colored pen. You could use highlighters or markers for this, but the problem I have with this is that it might bleed through.
The Bulleting System

A dot "·" is used for tasks that are not completed yet.
An "X" is used for tasks that have been completed. You can simply write over the dot.
If you haven't completed a task but wish to move it over to a new month, year, or day (depending on where your task is located), use ">".
If you have scheduled a task (ex. birthday party), use "<".
If you want to get rid of something, cross it out.
To mark scheduled events, use a circle "⭘".
Finally, when jotting down notes, you can use "-".
Getting Started
Now that you have your supplies, you might think that you are ready to begin. Before doing so, in order to make the task less daunting, I would suggest thinking about what you want to do with your bullet journal. There could be things that you want to change from the normal set-up. For instance, I decided that, due to a lack of space, I would not include a yearly planning spot. (I don't know what I want to do this year, anyway!)
Numbering the Pages
This was the first thing that I did, for two reasons:
- It was something that I could do when I didn't know where to begin.
- I could see how much space I really had. (I couldn't remember how many pages my notebooks had.)

When numbering my pages, I decided that I would skip the first page so that I could use it for an index or key, or possibly both. (As you can probably tell, I haven't decided yet.)
One Month at a Time: Monthly Log
Since I decided to skip the yearly log, next up for me was creating my monthly log. To make a simple monthly log, all you have to do is three simple steps:
- Title the page with the month.
- Write the dates of the month in a vertical line.
- Along this, write the first letter of the date's day. (Note: I left a space in between in case I wanted to mark it.)

If you look at my monthly log, you'll see that there's a fancy font at the top. You don't have to have fancy fonts or designs, but if you want to, feel free to do so.

Only make this month's log for now. At the end of the month, you can add next month's log after the daily logs for the current month.
The other part of the monthly log that most people will add is a section for that month's goals. All you need to do is title it ("Goals") and start adding them using the bulleting system. I separated my goals into two sections: "personal" and "blogging". You can separate yours, too. For goals that are not specific (for example, I wrote "write more") you can use the "-".


Daily Logs
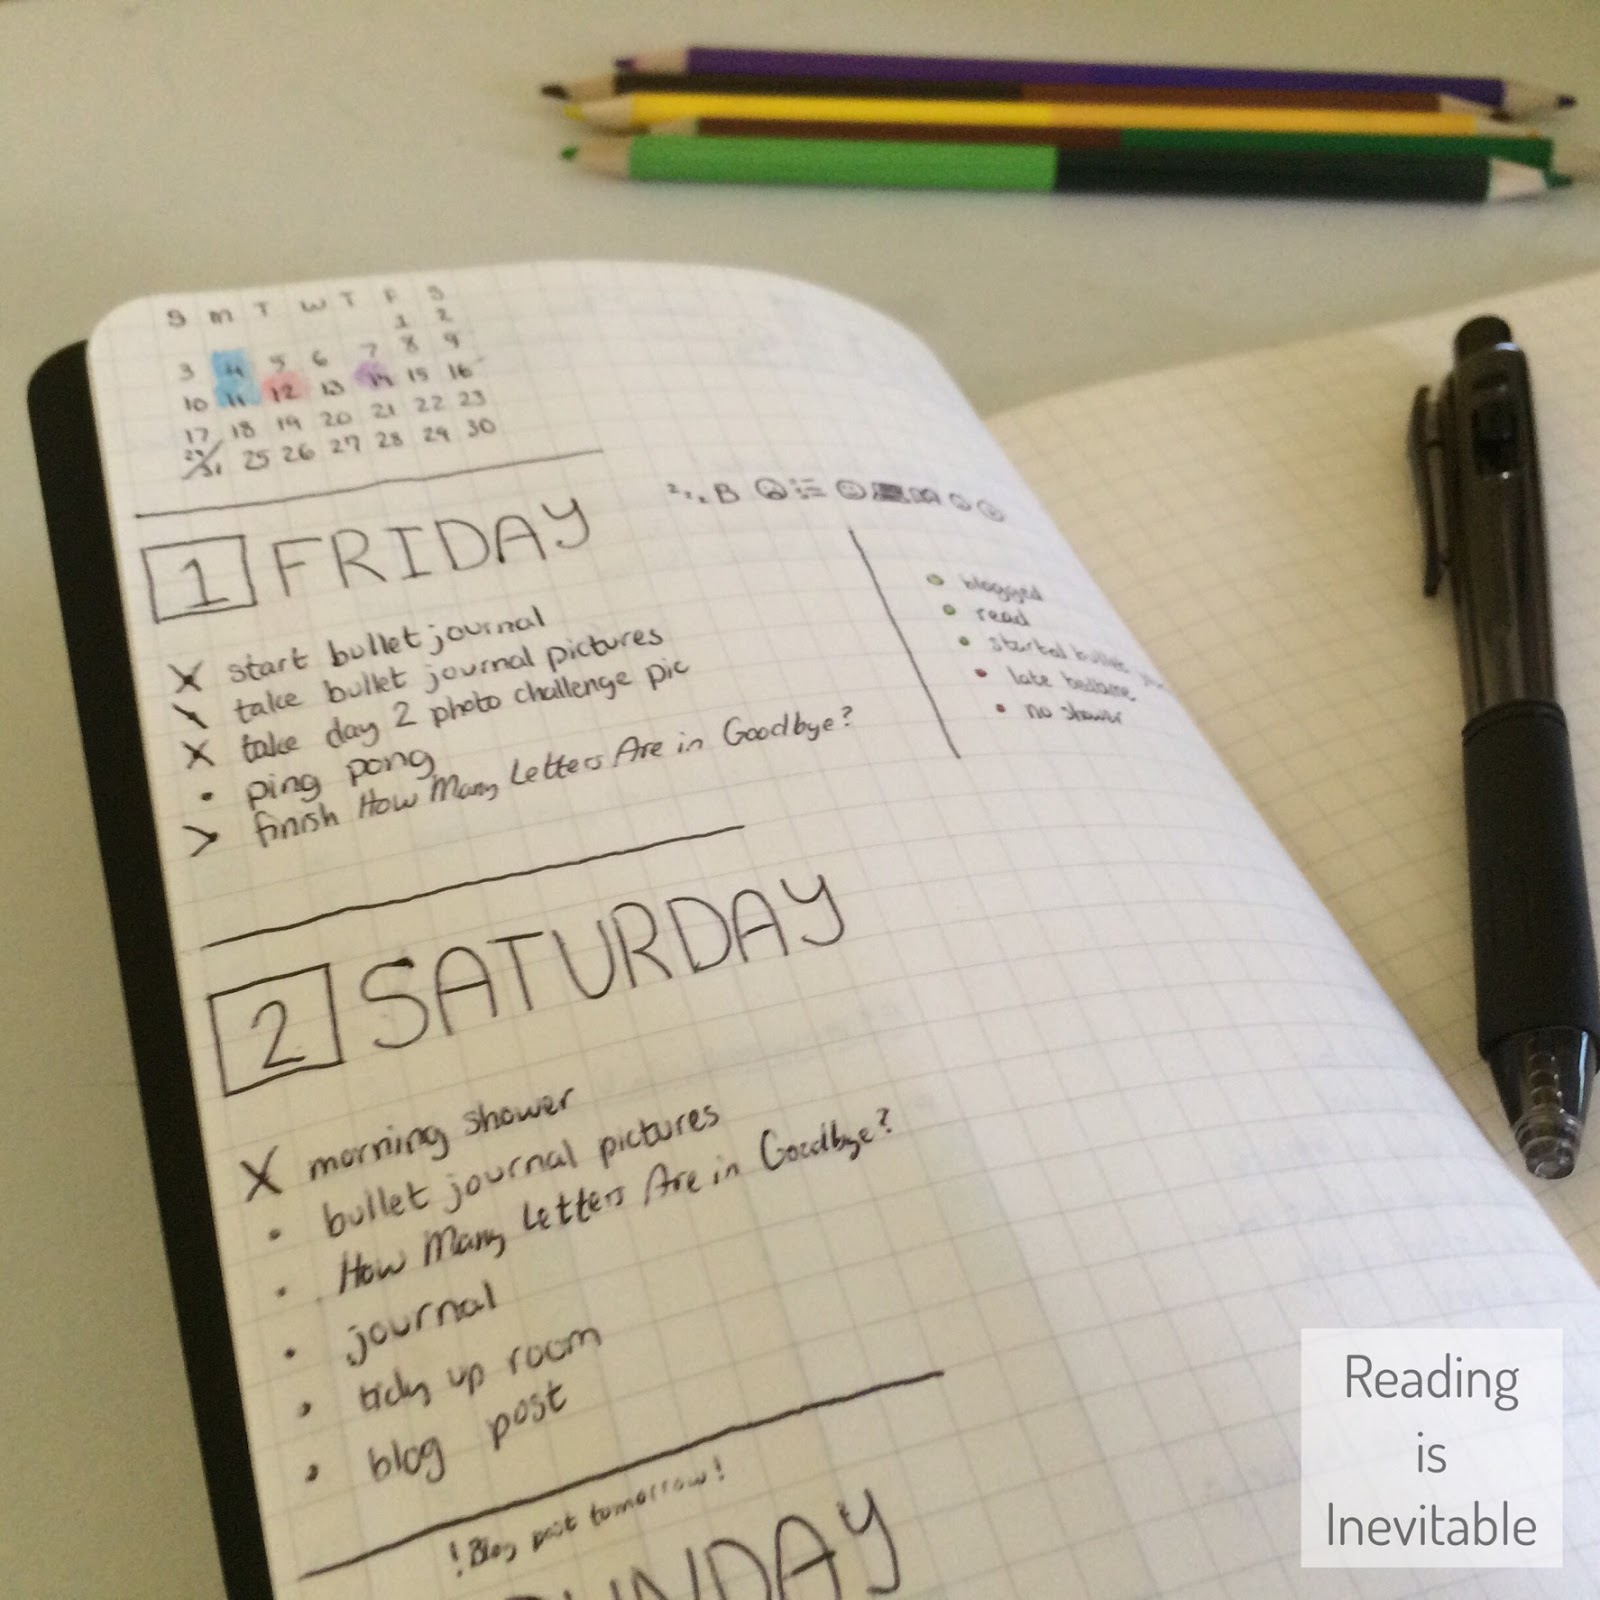
There can be several daily logs on one page. As you can see in my picture, I added three daily logs onto the page. In each daily log, you write down the day's tasks and events using the bulleting system. Of course, you must label the logs, and I did so by adding both the day and the date. I made the date a square for color coding purposes, which you'll see in a bit.

On the top near the day, I made little pictures to represent a timeline of my day. For instance, the computer represents that I went on my computer and the z's show that I was tired in the morning. This was one thing that I added to make my bullet journal more personal.

I found that I had extra space in my daily logs, so I made a line to create two parts. On one part, I had my tasks and events for the day, and on the other, I wrote down some good and bad things that I did that day. I thought that this could be useful reference for later, so that I can see what I need to do more or less of.

Color Coding
I think that using color is very useful and important in a bullet journal. It definitely makes things more organized, in my own personal opinion. I'll show you a few ways that I used color coding in my bullet journal.
One of the spots that I used color coding was on the page numbers. Using my multi-colored pen, I boxed the page numbers with a certain color. Blue is for monthly logs, and green is for daily logs. If I add some personal pages (doodles or journal entries, for example), those pages will get a purple box.

I also used a color-coding system in my monthly log. I colored in some dates for special things. The 4 is shaded blue (blue is for holidays in my bullet journal) because it is the 4th of July in the US. When I make the daily log for July 4th, I will shade the box blue.

I also added a little mini calendar at the top of the daily log, which also has the color-coded dates.

With that, I wish you luck in creating your own bullet journal! I will probably have another post published in early August to see how my first month of bullet journaling went.

Something that I added to my goals page is a chart to help me track and plan the photo challenge that we are participating in this month. I made two sections: one for taking the pictures for each day, and one for posting them.

Daily Logs
There can be several daily logs on one page. As you can see in my picture, I added three daily logs onto the page. In each daily log, you write down the day's tasks and events using the bulleting system. Of course, you must label the logs, and I did so by adding both the day and the date. I made the date a square for color coding purposes, which you'll see in a bit.
On the top near the day, I made little pictures to represent a timeline of my day. For instance, the computer represents that I went on my computer and the z's show that I was tired in the morning. This was one thing that I added to make my bullet journal more personal.

I found that I had extra space in my daily logs, so I made a line to create two parts. On one part, I had my tasks and events for the day, and on the other, I wrote down some good and bad things that I did that day. I thought that this could be useful reference for later, so that I can see what I need to do more or less of.

Color Coding
I think that using color is very useful and important in a bullet journal. It definitely makes things more organized, in my own personal opinion. I'll show you a few ways that I used color coding in my bullet journal.
One of the spots that I used color coding was on the page numbers. Using my multi-colored pen, I boxed the page numbers with a certain color. Blue is for monthly logs, and green is for daily logs. If I add some personal pages (doodles or journal entries, for example), those pages will get a purple box.

I also used a color-coding system in my monthly log. I colored in some dates for special things. The 4 is shaded blue (blue is for holidays in my bullet journal) because it is the 4th of July in the US. When I make the daily log for July 4th, I will shade the box blue.

I also added a little mini calendar at the top of the daily log, which also has the color-coded dates.

With that, I wish you luck in creating your own bullet journal! I will probably have another post published in early August to see how my first month of bullet journaling went.
I like your bullet journal! It looks both pretty and practical! Good luck with your journal!
ReplyDeleteI hadn't heard of a bullet journal but love the idea. Thanks for your detailed instructions! My favorite is the reason given for numbering the pages, "It was something that I could do when I didn't know where to begin." You captured me with that - we all need something we can accomplish when we don't know where to start.
ReplyDelete